31 May 2012

Our New Addition

thrifted blouse and skirt, Banana Republic heels
The past week and half have been a total blur. After my fact-checking project at Texas Monthly ended, I spent a week at Canyon Lake celebrating my best friend's graduation. When I got back from my much-needed vacation, I started my 38-hour-workweek at the bridal salon. It's great for my finances, but not so great for spending time with our new puppy. Yes, we got a puppy!

Our lives have been turned upside down (in a good way) since getting Charles, our 8 week old Cockapoo. He needs a lot of attention because he's so young, but we're training him so he's not needy and whiny. He's already making a lot of progress. It's definitely taking a lot of patience and time, but it's going to be worth it. I mean, just look at this face!


I seriously hadn't been on my computer for longer than 10 minutes since before all this happened. Now that everything has settled down, I finally have time to get back to blogging. I have to admit that it was a nice break, not having to make time to take pictures outside or come up with something to say about my outfits. I was able to get dressed without thinking about whether it was a good enough outfit for my blog or if I'd worn something too similar recently. I'm happy to be back, but it's definitely made me think about why I blog and if it's all worth it. Hopefully, I'll figure it out soon.

23 May 2012

Recovering Shopping Addict

dress from Goodwill, shoes from Texas Thrift Store, Gap denim jacket 
Remember when I fell of the no-shopping wagon a few weeks ago? It was because of this dress. I saw it at Goodwill and immediately fell in love. I just couldn't pass it up for $8! I've already worn it twice since I bought it, so it was definitely worth it.

So...I have to admit that I've fallen off the wagon again. I found some awesome shoes on Etsy last week and just couldn't say no. They're really cute 1970s heels with ankle straps and peep toes and just the right shade of tan. I put them on immediately after opening the package in the mail this afternoon and already have lots of outfits planned for them.

Slipping up twice in a one and a half month span isn't so bad, right? Please say no.

17 May 2012

We're Back!

vintage floral pants from Cream Vintage,
Forever 21 shirt and earrings, Steve Madden wedges
The title isn't referring to that awesome movie about dinosaurs from my childhood, in case you were wondering. Instead, "we"refers to my awesome pants. I found them at the vintage store where I used to work, hiding among the random items in the racks. Even though they probably used to belong to an elderly woman who wore them with a matching blouse and white orthopedic shoes, I love them all the same. They've been sitting in my closet, unworn, since last summer and I was so excited to break them out. It's like wearing pajamas!

I haven't worn these shoes since last summer, either. After wearing them with this outfit, I accidently left them at my best friend's apartment. It was pouring rain that evening and I didn't want to slip in the parking lot, so I wore flip-flops to walk to my car and forgot my wedges. Hopefully, I'll get them back soon and you'll see more of them than you can stand!

15 May 2012

Recipe: Chocolate Covered Strawberry Pie

When I say I like to bake, I really mean that I like baking things that don't require a lot of effort. I like recipes that making it seem like I put in a lot more time than I really did.

My Texas cake is a good example.

I'll tell you more about how I make my Texas cake another day. For now, I'll let y'all in on my secret to making delicious pudding pies. The options are endless because there are so many different flavors of pudding. For my latest pie, I decided to make a pie reminiscent of chocolate covered strawberries.

You'll need a pre-made graham cracker pie crust, a package of instant pudding in the flavor of your choice (chocolate, white chocolate, or vanilla works best with this particular recipe), fresh strawberries, hardening chocolate, and milk.


Pudding box usually have a recipe for pudding pie, but I suggest reducing the milk to 1.5 cups per package. Every time I follow the recipe on the box, the pudding comes out too watery. I generally use one and a half packages of pudding because it always seems too low in the pie shell with just one. This means I use two and a quarter cups milk when I use one and a half packages of pudding. In other words, ignore what the box says!


After you make the pudding, pour it into the pie shell. It should look creamy and delicious. Avoid hitting the graham cracker crust because it breaks easily. Observe the crumbs in the gooey goodness for proof.


Let the pie sit in the fridge for at least an hour to harden. Cut slices of fresh strawberries to top the pie when it's ready. Cover as much space of the pie with strawberries as you can.


Melt your hardening chocolate in the microwave according the the package's instructions. While it's heating up, prepare a baggie with a hole cut at the corner tip for drizzling.


When the chocolate is ready, pour or scoop it into the baggie and start drizzling. You can be as neat or messy as you want. Don't forget to eat the left over chocolate!


Let the chocolate harden and enjoy!


As you can see, this pie is so easy a baby could make it. But you probably wouldn't want your baby around warm melted chocolate or knives. I plan on trying a banana cream pie, soon. I'll be sure to let y'all know how that goes.

14 May 2012

Limbo

thrifted top, Urban Outfitters skirt, Forever 21 earrings, Bakers sandals,
This outfit makes me feel like I should be riding a magic carpet. I don't know if it's the print of my top or my flowy skirt, but I like it either way.

My project at Texas Monthly will be over soon, probably by the end of this week. Both my boyfriend and my best friend are graduating this Friday, so if I'm not done with my work at the end of Thursday, my project might run over into next week. I work both Saturday and Sunday at the bridal salon, so I'll have to squeeze in celebrating somehow.

Even though I graduated over five months ago, it seems like it was just yesterday. It feels weird to not call myself a "student". If I'm not a student, what am I? Maybe I'll feel differently when I find a job that I actually consider a career. Which reminds me, I should start checking the Houston job market again since I'll be moving in July. It's going to be like I just graduated all over again, applying for any job that seems applicable to my work experience. I'm definitely not looking forward to writing a ton of cover letters and never hearing back from possible employers. Searching for a new job is never enjoyable unless you know the right people. So...does anyone know who's hiring in Houston?

11 May 2012

DIY: Tulle Ballerina Skirt

I (sorta) showed y'all how my homemade tulle skirt turned out, but now I want to show you how I did it. It took me about five hours spread over two days, so it's definitely not a wham-bam-thank-you-maam kind of project. I already had most of the stuff I needed, but I spent about $10 on the supplies I didn't have. Let's get started!

Step 1: Gather your supplies 
You'll need two yards of scrap fabric, seven yards of tulle, thread and 1.5" wide ribbon to match the tulle, scissors, needles, and a measuring tape. I also used my sewing machine for all the stitching. I do not recommend hand sewing this project as it will take you way too long. The yellow papers at the top of the photo were my quick sketches of what I was actually going to do. If I'd had a tutorial like this, I wouldn't have needed that!

Step 2: Cut layers of tulle to the appropriate size and length
I measured my waistline where I wanted the skirt to sit and added about 8" to that (the reason why is coming up). For the length, I measured the length of a skirt in my closet that fell right below my knees. The tulle I bought at Hobby Lobby was folded once, so I used that to my advantage. I basically cut two layers at a time. I kept trying to line up the fabric to make sure it was all even, but tulle doesn't really like to stay in place. If you're measuring each piece and cutting it all the same, they should be even. If they aren't, you can always trim it at the end.

Step 3: Cut a waistband from the scrap fabric to pin the tulle layers onto
I cut mine about 1.5 inches wide and also added about 8" to the length to match the tulle. You'll need extra length on the waistband for the next part so don't forget it!

Step 4 : Pleat the first layer of tulle about every 1.5 inches as you pin it to the waistband
I wasn't very accurate about this. I realized quickly into the project that tulle and I don't get along very well, so I stopped trying to be so precise and just went for it. I just made sure that there wasn't any extra tulle by the time I got to the end of the waistband. In case you don't know how to pleat, it's as easy as pinching the fabric between your fingers and folding it over to one side. Pleat until all the tulle from the first layer is pinned to the waistband.

(a view of the pleated tulle pinned to the waistband)
After you finish pinning the first layer to the waistband, sew it down. Then, repeat the pleating process with the next layer on top of the previous layer. So on, and so forth. Just be sure to sew on each layer as you go. 

(what it looks like after all the layers are sewed on to the waistband)

Step 5: Stitch the skirt together (inside out!) until about five inches below the waistband
Fold the skirt together with the side everyone will see on on the inside. It doesn't really matter which side you choose, at least in terms of the waistband because you'll cover it with ribbon (coming up). Sew from the hem to about four/five inches below the waistband. Don't sew all the way up because then you won't be able to get it past your hips. (Somehow, I almost forgot this part.)

Step 6: Pin and sew ribbon to the waistband
I didn't take a picture, but I sewed along the bottom edge of the ribbon to attach it to the waistband. You want to make sure the "scrap fabric" waistband is completely covered.

Step 7: Sew hook and eyes to the waistband 
At first, I only sewed one hook and eye onto the waistband, but it didn't seem like enough when I tried it on. I removed it and added two instead, which I think worked much better.

Step 8: Sew the edges of the ribbon
I probably should have done this before attaching the hook and eyes. I noticed that the ribbon was already fraying while I was working with it, so I figured it was a good idea. It also gives it more of a finished look.

A quick peek via Instagram!

These are some tips I'd like to pass on to whoever plans to try this:

You'll need a lot of space. I sat on my kitchen floor when I wasn't at my sewing machine.

I could've probably used at least two/three more yards of tulle to make it a little fuller.

Cats love tulle. Keep those kitty claws away while you're working on this.

Tulle is very sheer, so you'll need something to wear underneath. I'm planning to wear a white skirt that has some volume built into it.

You'll need a way to get in and out of the skirt, whether it's a zipper or hook and eye.

Beer and/or wine always makes DIY better.

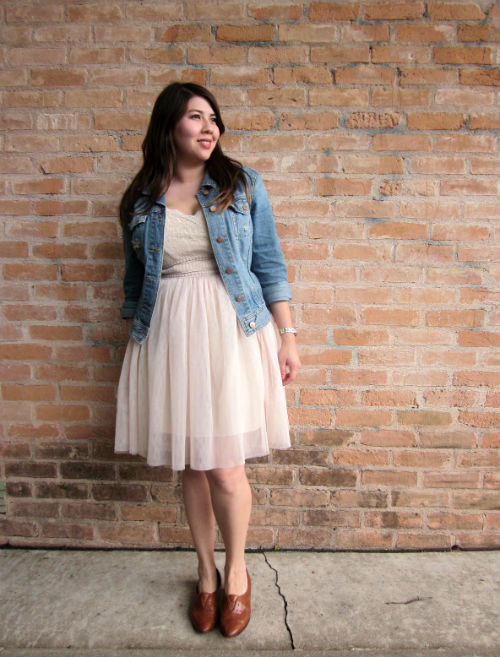
I plan to take outfit photos with my new homemade skirt, but I haven't found the right occasion to wear it. They're coming soon, though!

09 May 2012

Cheater, Cheater

thrifted skirt, vintage blouse, Zara heels, Forever 21 earrings
As I already mentioned, I fell off the no-shopping wagon last week. In my defense, it was a pretty dress from Goodwill for $8.99 that I just couldn't pass up. Lesson learned: it's impossible for me to go to Goodwill without looking at the clothes. I originally went in to find ceramic pots for my new succulents. I didn't realize how hard it would be to find fun pots with draining holes. Every time I'd pick up something bright and colorful, I'd be disappointed to see that there were no holes. I read somewhere that you can make holes yourself, but I envisioned broken ceramic all over the place and decided it wasn't a good idea.

Instead, I decided to make more coffee can pots. I made a couple a few weeks ago to plant cilantro and flowers and since it worked so well, I figured it would work for succulents too. The best part is that it's amazingly easy. All you need is a large aluminum can (it can be a coffee can, a giant mandarin oranges can, or any fruit or vegetable can you desire), spray paint in your color of choice, a knife, and some gloves.

If your can has a label, remove it. Soak it in soapy water overnight if you need to. When your can is nice and bare, poke about four holes in the bottom for drainage with your knife. You can even use a nail and hammer if you don't want to mess up any of your knives. Then, put on your gloves and head outside to a spot that's not too windy. Set it upside down and start spraying. Wait a couple of minutes before you move it, then pick it up carefully and set it somewhere to dry overnight. It should be ready to use the next day!

Here's how mine turned out:


Easy peasy lemon squeezy!

Sorry about that. But seriously, this is so much cheaper than buying pots. Matt even helped me spray paint polka dots on my latest can. Photos and instructions for that project are coming soon!

08 May 2012

MIA

thrifted skirt, denim jacket and shirt from Gap,
Forever 21 earrings, Bakers sandals
Please excuse my recent absence. I'm not sure what's been keeping me away, but I seriously haven't taken an outfit photo or posted anything in at least five days. In fact, I barely even remember wearing this outfit, but I do know that I wore it to work sometime last week. At the end of last week and throughout the weekend, instead of channeling my energy into documenting my outfits, I tackled a few DIY projects. Although they were all successful, I'm really proud of one particular project. Allow me to elaborate.

I stumbled upon KTRstyle last week and I immediatly fell in love with her homemade tulle ballerina skirt. Without even pausing to think about how difficult it might be, I decided I needed a skirt like that in my life. Since I've banned myself from shopping (I caved once last week, shhhh), I figure it doesn't count if I make the clothing item myself. So, I spent two days making a mint ballerina skirt that turned out way better than I expected. I haven't taken outfit photos with it yet because I still need a plain white slip to wear underneath, but here's a preview via Instagram:

I'll be posting a how-to this week, so you can make your own! I don't know about you, but I want one in every color. I'll also be sure to post outfit pictures wearing my homemade skirt later this week when it finally stops raining.

02 May 2012

Clothing & Body Type

Urban Outfitters lace top, Forever 21 tank top and earrings,
thrifted pants, Banana Republic heels
I unintentionally decided to participate in Kyla's 31 Blogging Days of May. After writing my post yesterday about my updated college outfit, I stumbled upon her proposal for this month's posts. Yesterday's post just happened to fit the topic (style retrospective), so I decided to go along with it for the rest of the month.

I met Kyla of Blue Collar Catwalk briefly during the 2012 Texas Style Council. It definitely wasn't enough time to get to know this fabulous gal. For starters, she's into roller derby AND has a fabulous sense of style. Even better, she is 100% comfortable with her body. Which brings me into today's topic...

Clothing & Body Type!

Surely, this is everyone's least favorite topic. It's definitely forced me think about a subject that I usually avoid. I've gained about 10 lbs since I started college, but I don't really feel any heavier. In fact, I still wear the same size I always have. I started jogging recently, but my goal isn't to lose weight. I just want to be healthy. 

As far as dressing for my body type, I always have to be conscious of my larger-than-average chest. I can't wear anything with too high of a neckline or else I look HUGE. At the same time, I also can't wear anything too low or I'll look like a hoochie mama. Don't even get me started on bathing suits and bras. It's a pain, but I'm grateful the only thing I have to worry about is looking too boobalicious. 

01 May 2012

Sentimental Clothing

H&M shirt (five years old), thrifted skirt (gift from my stepmom),
Forever 21 earrings, Banana Republic wedges
I used to wear a version of this outfit all the time before I started my blog. But instead of this conservative skirt and my grown-up wedges, I'd wear my short, black American Apparel pocket skirt and flat sandals. In fact, it used to be one of my go-to outfits in college. It's funny how easily you can grow out of certain styles. Now, I only wear that American Apparel skirt as a swimsuit cover up. It just doesn't feel like me anymore.

On the other hand, I have a special relationship with this particular red-orange top. I bought it in Rome when I was 17 years old and I'm so glad I still have it. Unlike the American Apparel skirt, this shirt makes me feel youthful in a good way. I wanted to wear it the other day, so I decided to recreate my old go-to outfit in a more "grown-up" way. I'll always consider this top to be an essential piece of my wardrobe. It has too many memories!